Git workflow
This document describes the git workflow that should be used when contributing to open source projects on GitHub. It assumes a very basic understanding of git (commits, branches, etc.) using the command line.
Note: This workflow is designed for open source (i.e., public) repositories. The workflow for private repositories may be slightly different, in particular, the repository’s team may prefer for you to not fork the repo but rather push branches to it directly (although note that GitHub does allow you to fork private repositories that you have push access to and keeps the fork private).
For this document, we will suppose that you want to contribute a patch to sympy/sympy.
NOTE: If you want to test out this guide without making an
actual fix, please test against THIS REPO (asmeurer/git-workflow). Do not
make a pull request against sympy/sympy unless you are making an actual
change.
Cloning and forking the repository
Note: The steps in this section only need to be performed once per repository (e.g., if you contribute a second change to sympy/sympy, you would not need to repeat them, but if you contribute to sympy/sympy-live you will need to repeat them for that repository).
-
Clone the repository. Click the green “Clone or download” button ①, and copy the url ② and type
git clone clone-urlat the terminal. Replace
clone-urlwith the url that has been copied to your clipboard. For sympy/sympy, it will begit@github.com:sympy/sympy.git. If you have not set up your ssh keys with GitHub, use the https url by first clicking thehttpsbutton ③.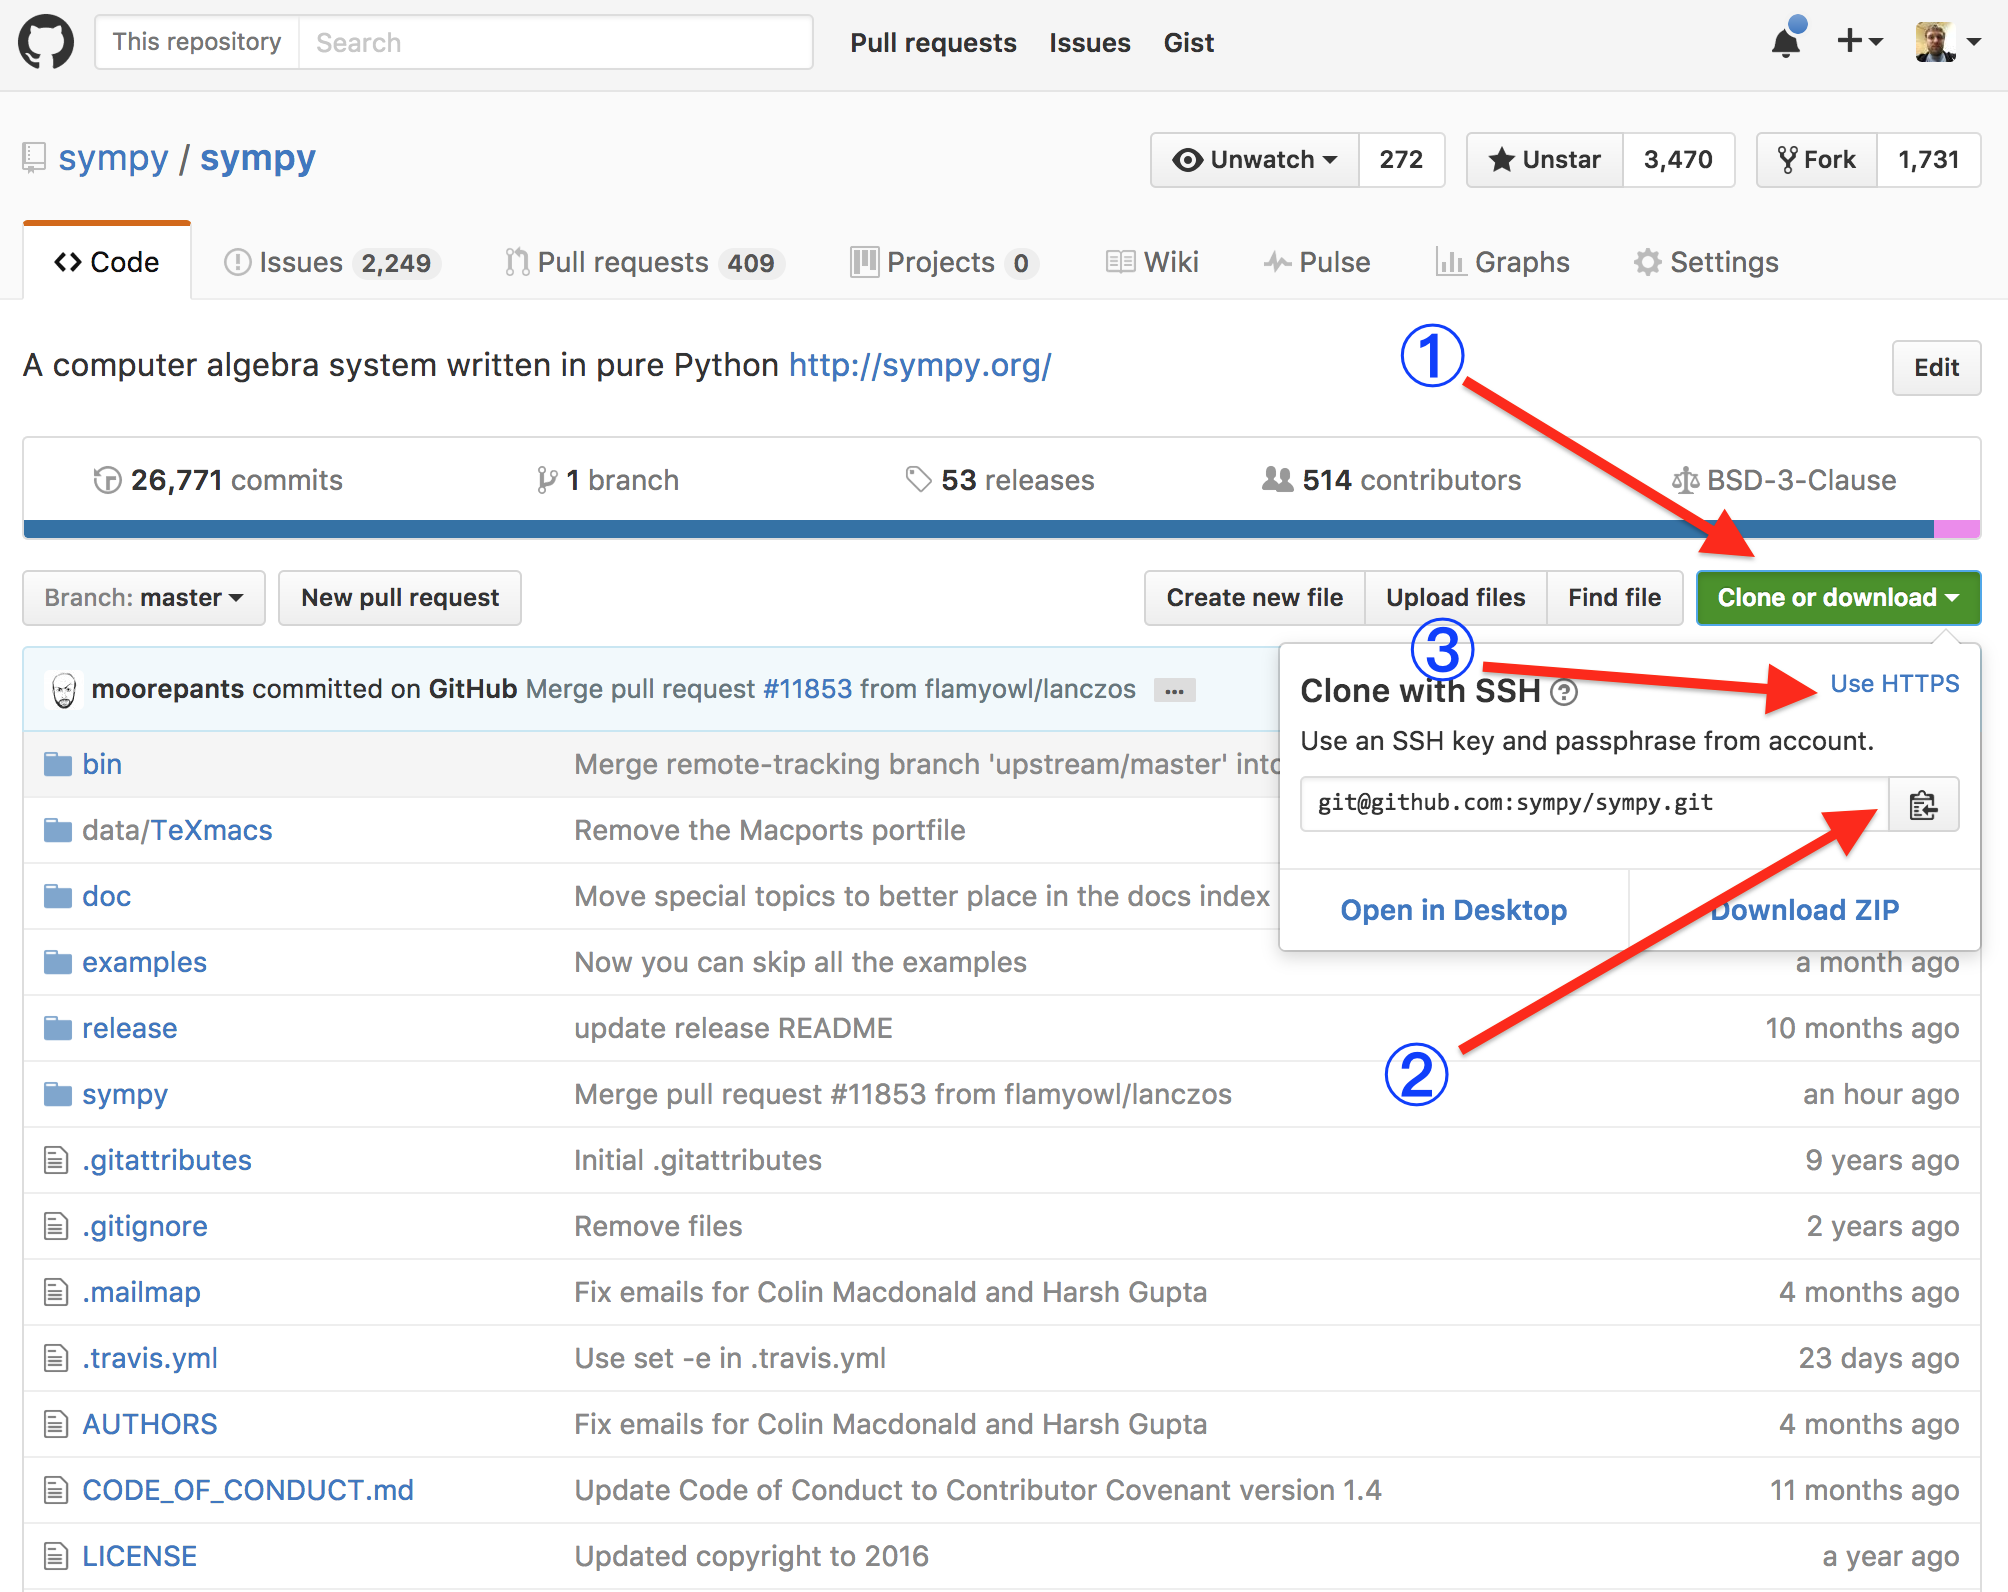
Note: It is important that you clone from the repo you are contributing to (like sympy/sympy), not your fork of the repo.
-
Fork the repo on GitHub to your personal account. Click the
Forkbutton on the sympy/sympy page.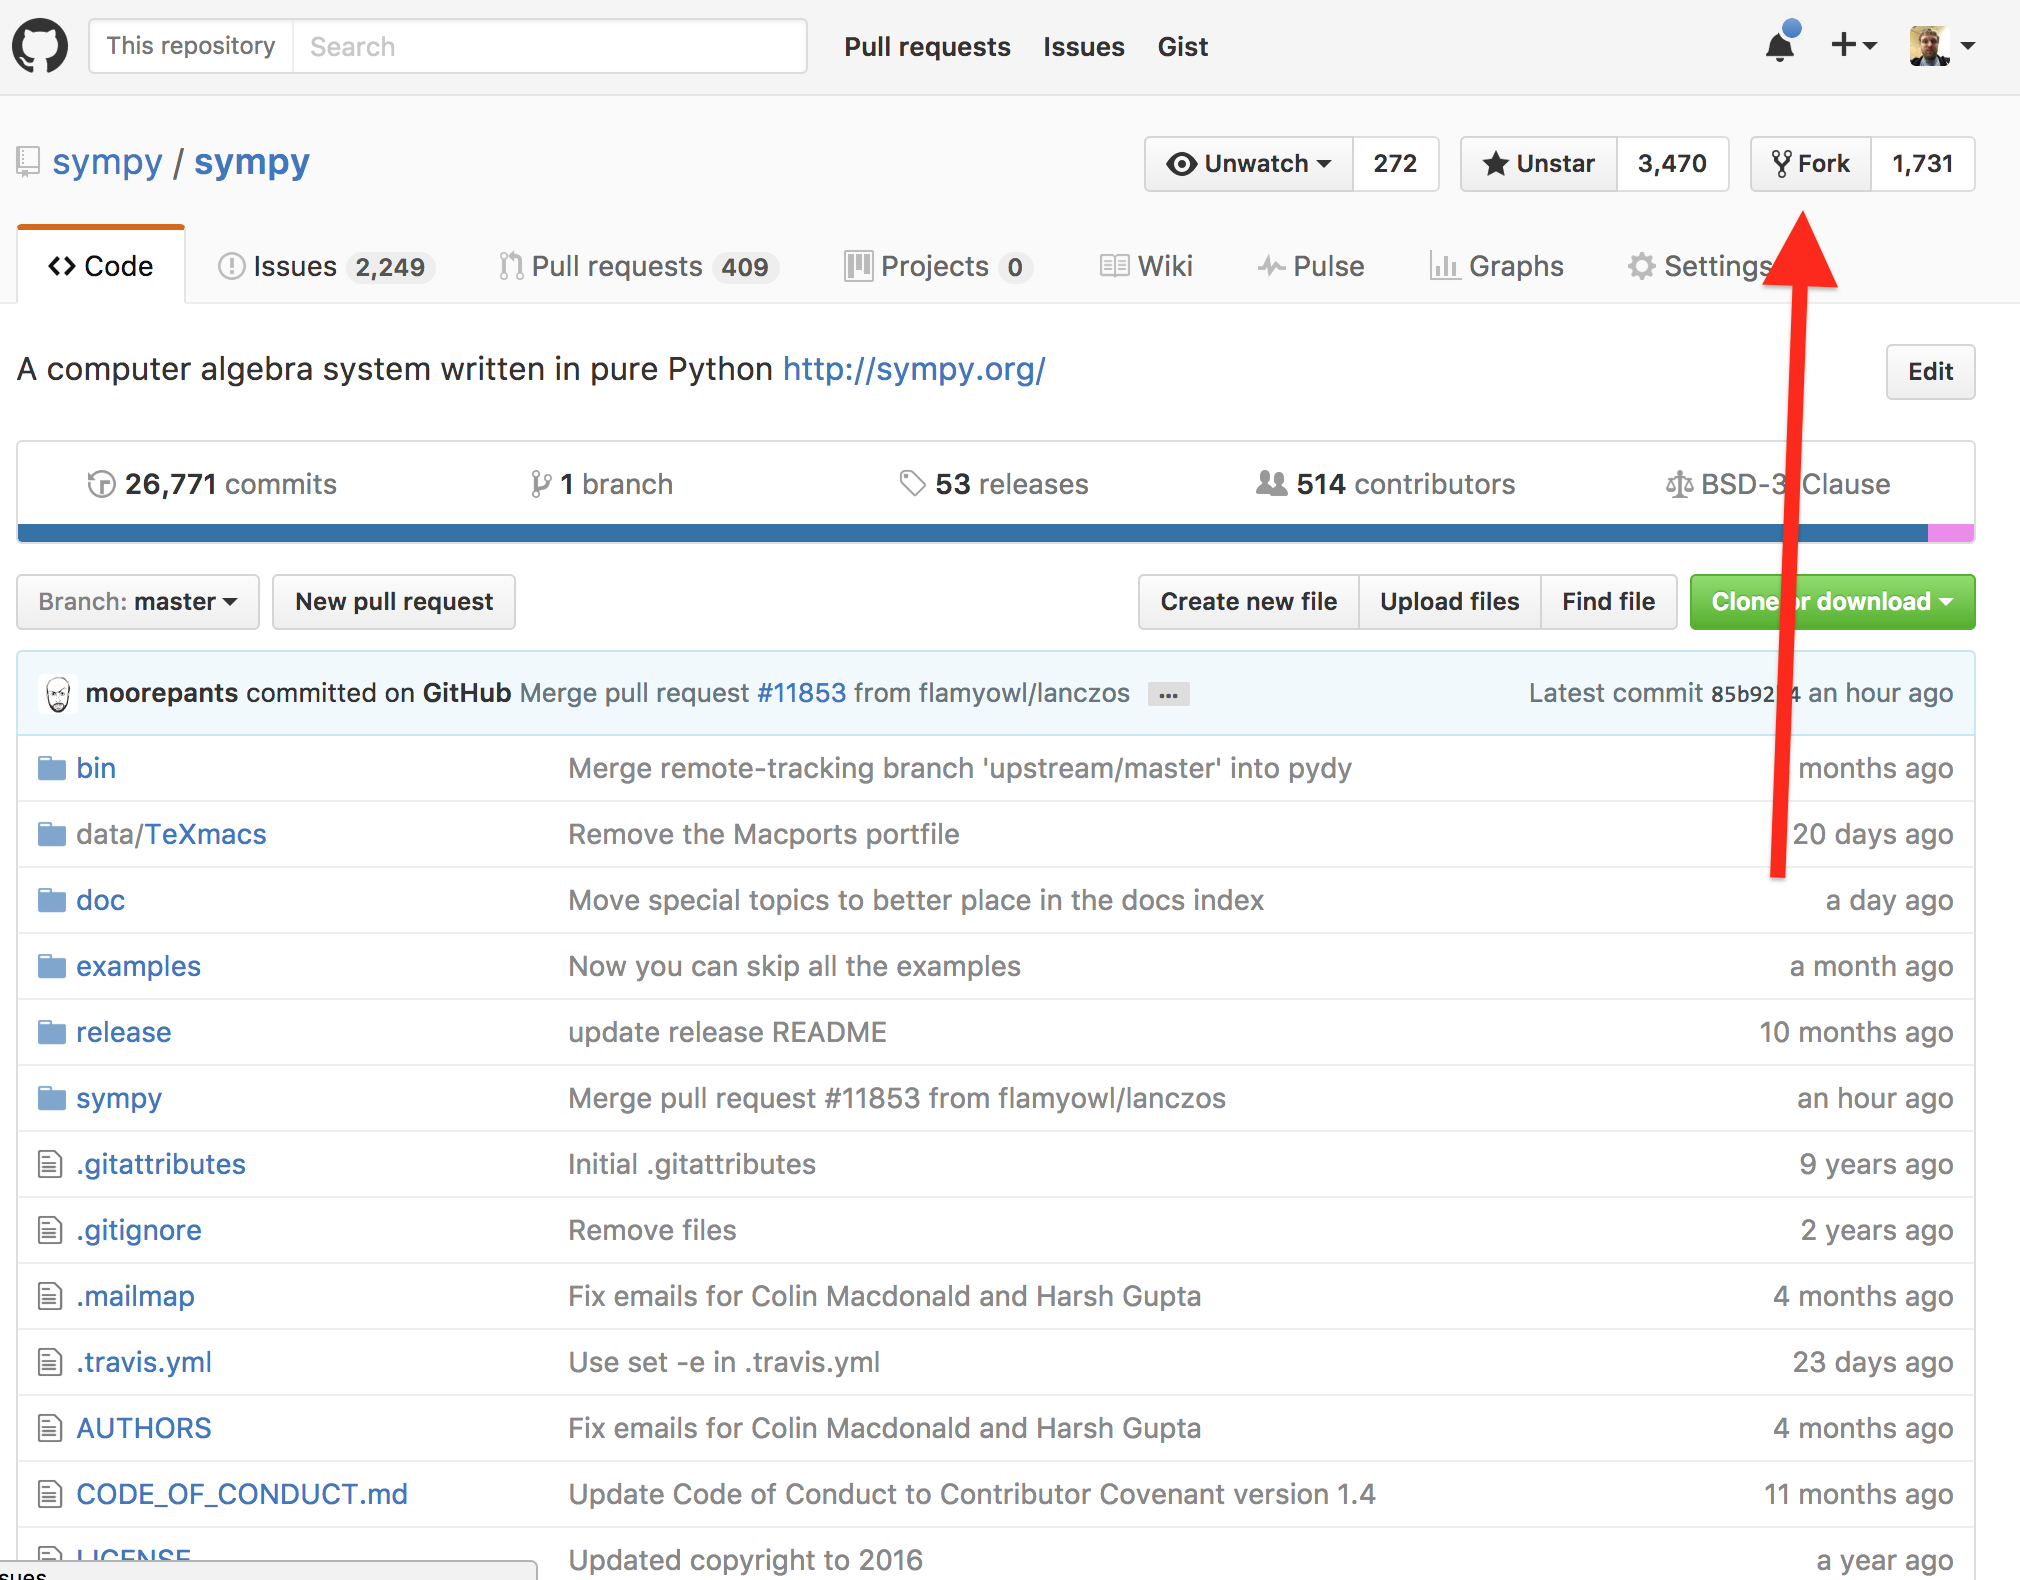
If you are presented with a list of organizations, click on your GitHub username.
-
Add your fork as a remote. This remote will be named after your github username. Go to the fork of your repository, in this case,
https://github.com/your-username/sympy(replaceyour-usernamewith your GitHub username), and copy the clone url as in step 1.cdto your clone from step 1 and rungit remote add your-github-username fork-url(replace
your-github-usernamewith your GitHub username andfork-urlwith the url that was copied to your clipboard). You will be able to tell it is your fork url because it will have your GitHub username in it. For instance, if your username isgithub_user, you would run the commandgit remote add github_user git@github.com:github_user/sympy.git.
Remember, the above three steps only need to be performed once per repository. Once you have cloned and forked a repository once, there is no need to clone or fork it again.
Making changes
Before you make any changes, you should make a branch. Remember to never
commit to master. The command git status will tell you what branch you are
on. I recommend putting the git branch in your command prompt, so that you
will always know what branch you are on. See
this guide on how to do this.
It is important that you never commit to master because master will be the branch that you pull upstream changes from (e.g., changes from sympy/sympy).
-
Update master. Before you make any changes, first checkout master
git checkout masterand pull in the latest changes
git pullThis will make it so that your changes are against the very latest master, which will reduce the likelihood of merge conflicts due to your changes conflicting with changes made by someone else.
-
Create a branch. Once you have done this, create a new branch. You should make a branch name that is short, descriptive, and unique. Some examples of good branch names are
fix-install,docs-cleanup, andadd-travis-ci. Some examples of bad branch names arefeature,fix, andpatch. The branch name choice is not too important, so don’t stress over it, but it is what people will use to reference your changes if they want to pull them down on their own computers to test them, so a good name will make it easier for others to understand what your branch does. In this example, the branch name isfix-install.To create the branch, run
git checkout -b branch-name(replace
branch-namewith the branch name you chose). This will create a new branch and check it out. You can verify this withgit status. -
Make your changes and commit them. Once you have created your branch, make your changes and commit them. Remember to keep your commits atomic, that is, each commit should represent a single unit of change. Also, remember to write helpful commit messages, so that someone can understand what the commit does just from reading the message without having to read the diff.
For example, at the command line, this might look like
git add filename [filename ...]
git commit
This will open an editor where you can write your commit message.
-
Push up your changes. Push your changes to your fork. Do this by running
git push your-github-username branch-name(replace
your-github-usernamewith your GitHub username andbranch-namewith the name of the branch). -
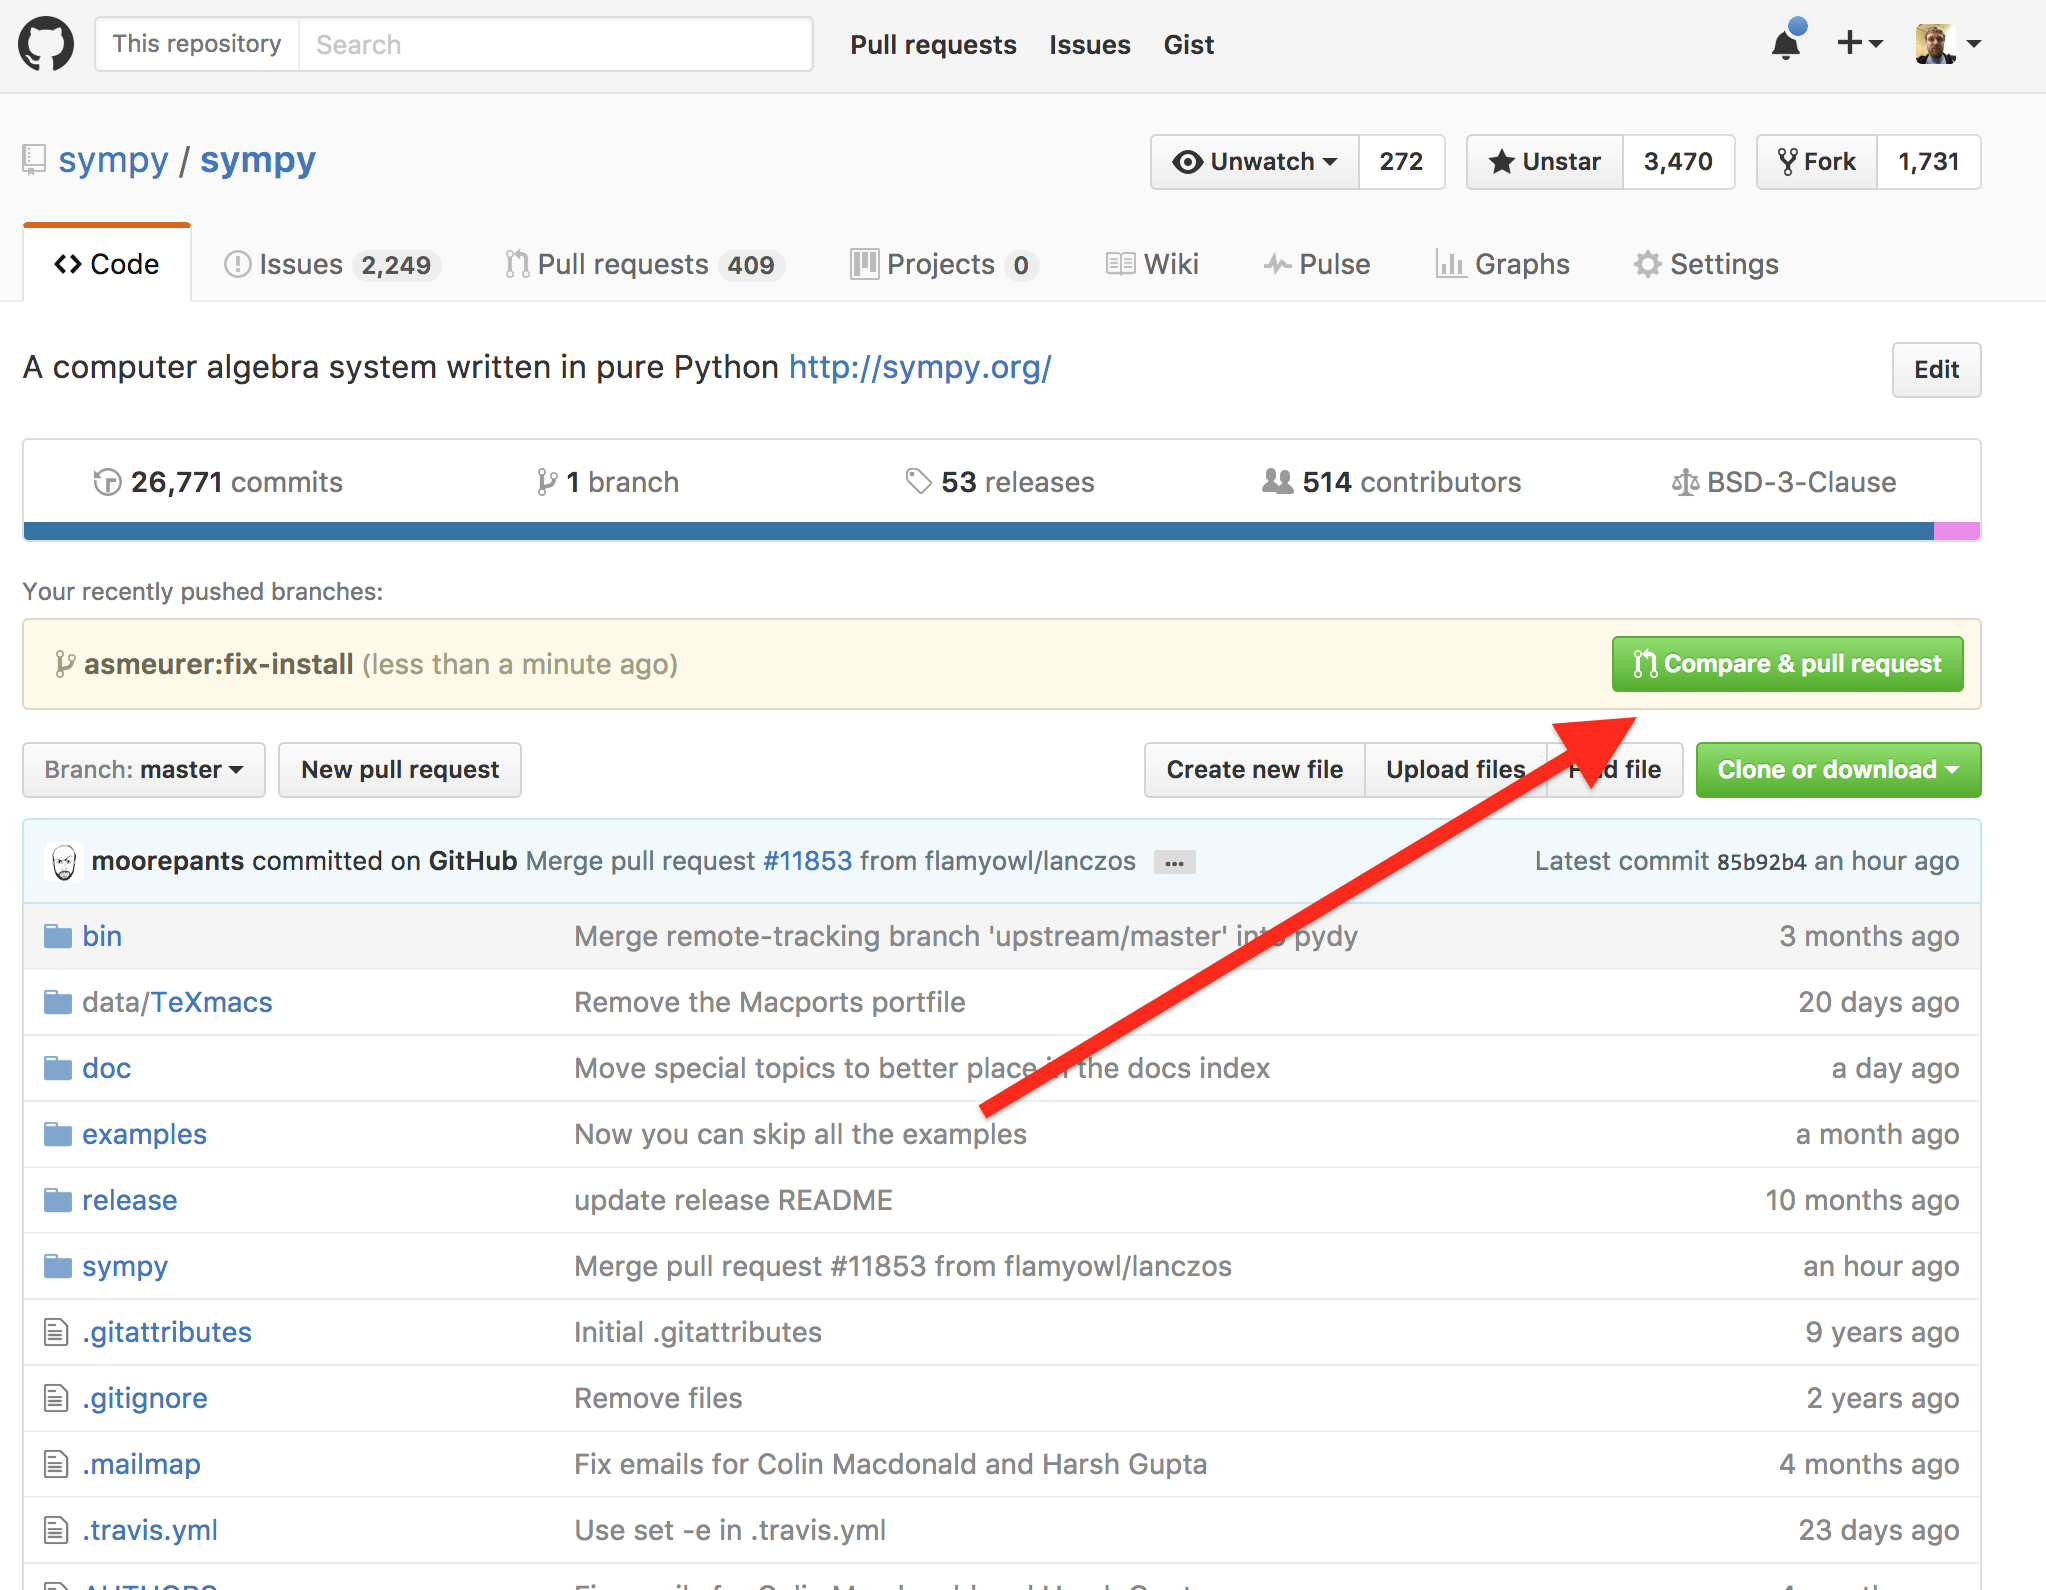
Make a pull request. If you then go to your fork on GitHub, you should see a button to create a pull request from your branch. It will look something like this:
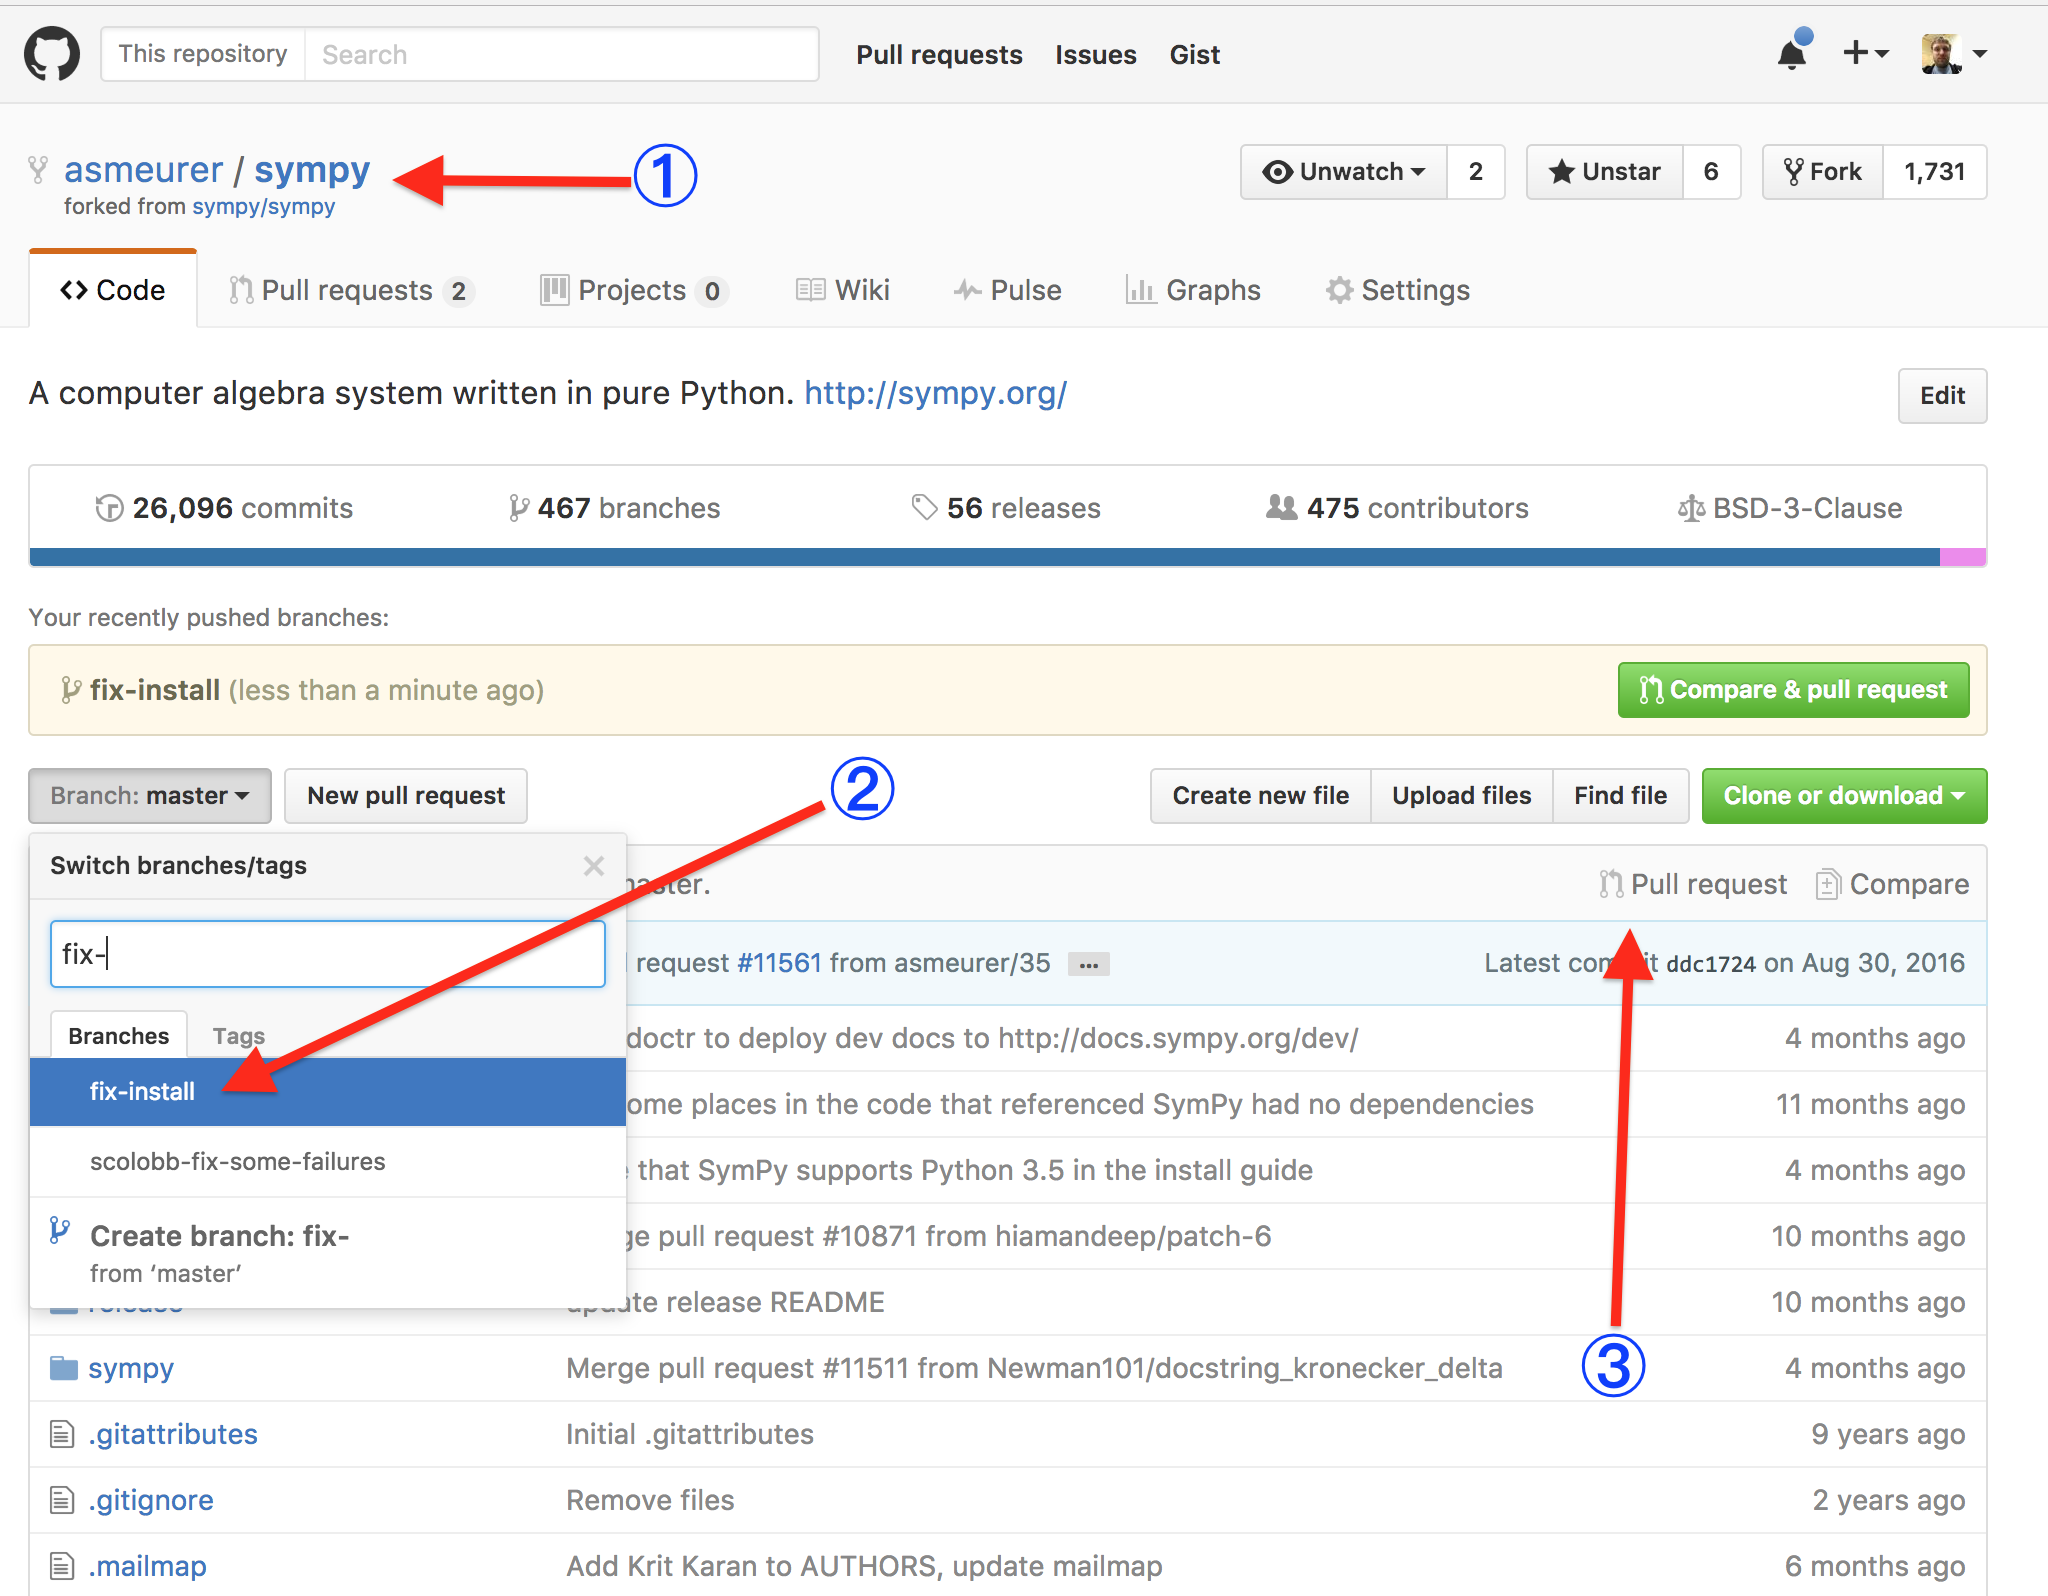
If you do not see this, go to the GitHub page for your fork ①, select the branch from the branch popup ② and click the pull request button ③.
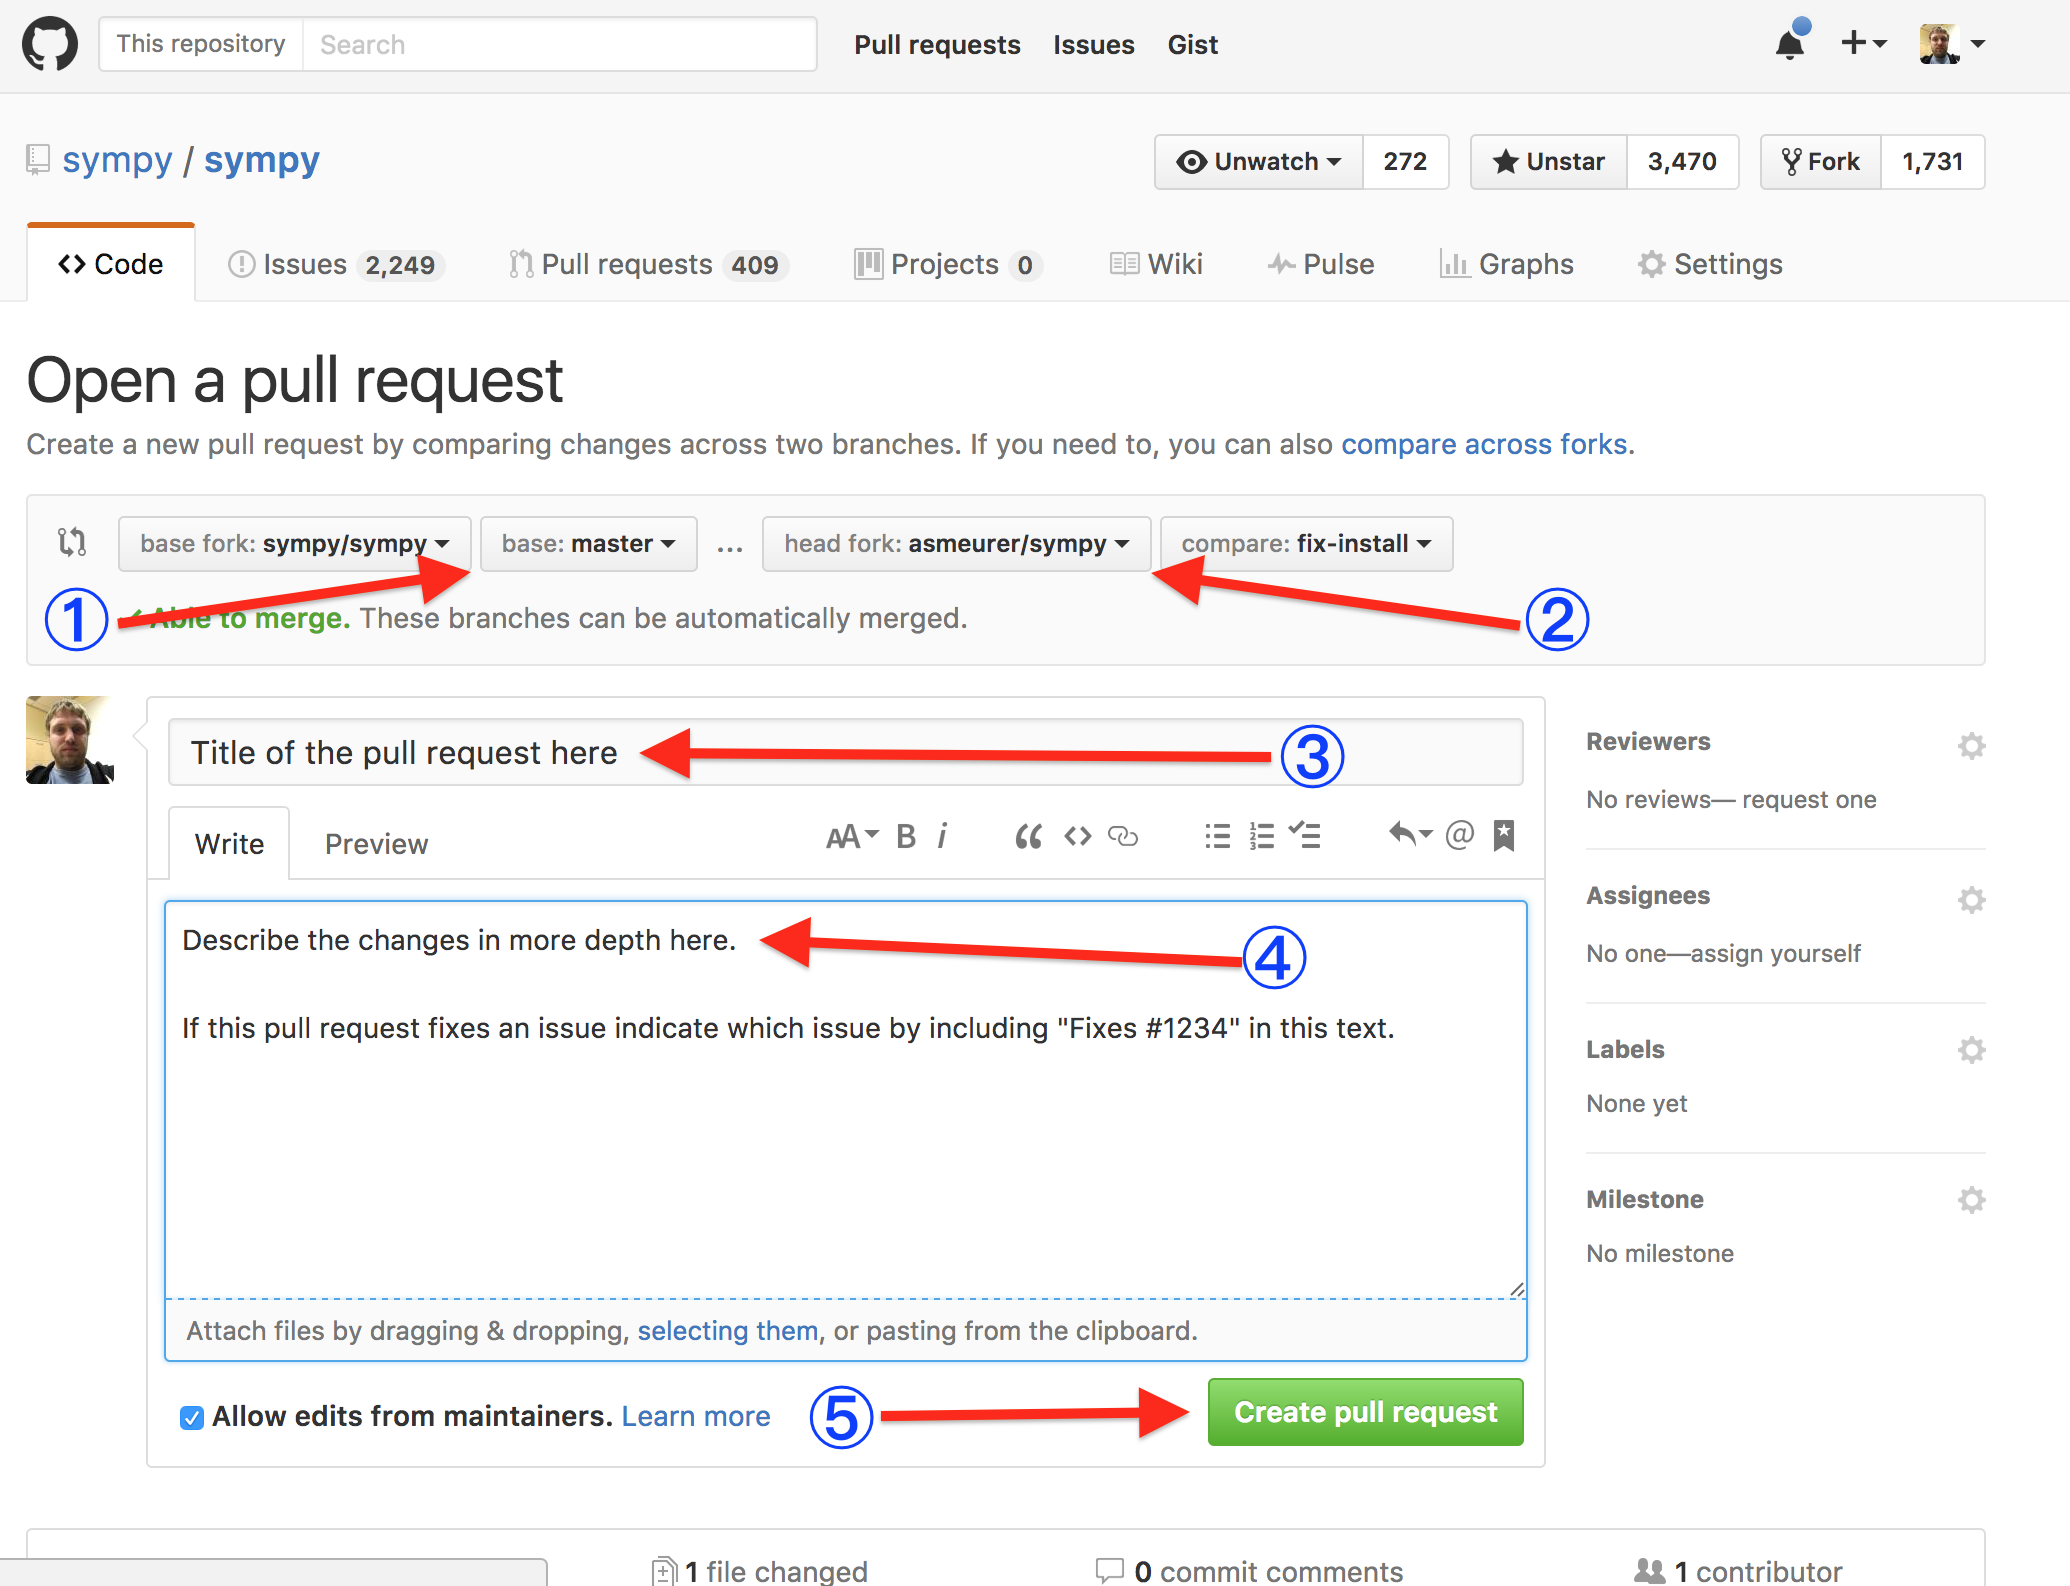
Once doing this, you will be presented with a page. This page will show you the diff of the changes. Double check them to make sure you are making a pull request against the right branch.
Things to check here are that the base fork is the upstream repo ① (in this case, sympy/sympy) and the branch for the upstream repo is master, and that the head fork is your fork ② and the branch is the branch you wish to make the pull request from.
Enter a descriptive title in the title field ③. This is very important, as it is what will show up in the pull request listing and in email notifications to the people in the repo. Pull requests with undescriptive titles are more likely to be passed by. If the pull request fixes an issue, I recommend putting the issue number in the pull request description ④, not the title. People generally do not know issues by number, so a pull request that is just titled “fix for issue #1234” is more likely to be passed by, as it is unclear what it does from the title.
If there is more description or discussion about the pull request than what fits in the title field use the description field ④.
If the pull request fixes an issue, you can add “fixes #1234” (replace 1234 with the actual issue number) in the pull request description ④. This exact format, “fixes #1234” is important, as it will cause GitHub to automatically close the issue when the pull request is merged.
Once you are done, click the “create pull request” button ⑤.
-
Pushing additional changes. Once you have created the pull request, it will likely be reviewed and some additional fixes will be necessary. Do not create a new pull request. Rather, simply make more commits to your branch and push them up as in steps 3 and 4. They will be added to the pull request automatically. Note that although GitHub does notify people when you push new changes to a branch, many people have these notifications disabled as they can be quite noisy. So it is a good idea to make a comment on the pull request whenever you do so to notify people that it is ready to be reviewed again.
Once the pull request has been reviewed successfully, someone with push access to the main repository will merge it in. At this point you are done. You can checkout master and pull as described in step 1 and your changes should be there.
Important points
The important things to remember from this document are
-
You only need to clone and fork once per repository.
-
Always clone from the main repository and add your fork as a remote.
-
Never commit to master. Create a branch and commit to it.
-
Use
git statusoften to check what branch you are on and see if you have any uncommitted changes. -
Be descriptive in your branch names, commit messages, and pull request title and descriptions.
-
Once you have a pull request for a branch, you can push additional changes to the same branch and they will be added to the pull request automatically. You should never create a new pull request for the same branch.
-
Comment on the pull request when you want people to know that you have pushed new changes. Although GitHub does notify people of commit pushes, people are more likely notice your changes if you leave a comment.